JWT feat. Django
Introduction
In this post, I am going to talk about JSON Web Token(JWT), and how to implement it in DRF. First of all, JSON Web Token itself is just “an open standard (RFC 7519) that defines a compact and self-contained way for securely transmitting information between parties as a JSON object”[1].
However, in this post, I will refer to it as the JWT Authentication method. So, JWT is an authentication method that securely transmits user authentication information in the form of a JSON token. I will explain how it works in detail later in the post.
Table of Contents:
- Structure of JSON Web Tokens
- JWT Auth Method Workflow
- Benefits of using JWT
- Security concerns when using JWT
- Implementing it in DRF(Django Rest Framework)
Structure of JSON Web Tokens
A JSON Web Token consists of three parts.
- Header: typically consists of the type of the token, and the signing algorithm. It is usually encoded using base64Url.
{ "alg": "HS256", "typ": "JWT" } - Payload: contains the claims (information about user). There are three types of claims.
- Registered Claims: provided useful and exchangable informations.
  {
  "sub": "1234567890",
  "name": "John Doe",
  "admin": true
  }
- Registered Claims: provided useful and exchangable informations.
- Signature: created to make sure that the token is not forged, or manipulated. In case your algorithm uses private key, like RSA, it can also verify that the sender of the JWT is who it says it is.
- It is created by hashing, or encrypting, depending on your algorithm, the encoded header, payload and secret. In the case of django, the secret would be the django’s secret key.
- At the end, a JSON Web Token would look something like this.
  // Example JSON Web Token
  eyJhbGci0iJIUzI1NiIsInR5cCI6IkpXVCJ9.
  eyJzdWIi0iIxMjM0NTY30DkwIiwibmFtZSI6IkpvaG4
  gRG91IiwiaXNTb2NpYWwiOnRydWV9.
  4pcPyMD09o1PSyXnrXCjTwXyr4BsezdI1AVTmud2fU4
JWT Auth Method Workflow
Example Login workflow using JWT
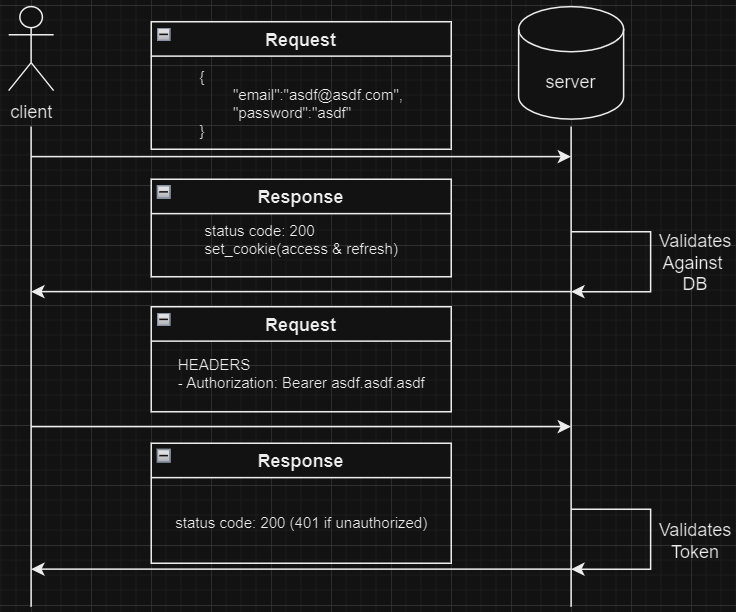
- User provides necessary information (e.x: email & password), through a secured path (e.x: https), and makes an request to server.
- The server, in this case django, validates the information against the Database.
- If valid, server signs and creates a JSON Web Token and return it to user.
- User stores it in secure space (e.x: HttpOnly Cookie).
- User put it in the Authorization header using the Bearer schema whenever make request to server
Authorization: Bearer <token> - Server valides user’s permissions using that token in the header
I hope that example workflow was enough to grasp an insight into how JWT authentication method works. For more detailed information, checkout this great page
- https://jwt.io/introduction
Benefits of using JWT method
As you may have already noticed, this JWT method comes in handy when using REST API. Since RESTful APIs are stateless, they do not store any information about the session. Without JWT, the user might have to provide their email and password every time they make a request. However, with JWT, the server can sign and give out these tokens, which usually expires after a certain amount of time, to authenticate each request and identify the user.
Security Concerns
- Do not put sensitive information in payload
- JSON Web Tokens are easily decoded. So you should never include sensitive information like password in your token’s payload.
- Keep secret key secure
- Make sure you have kept your secret key in an env file that is NOT UPLOADED to any remote repositories.
- And regarding creating a secure django secret key, refer to hlongmore’s answer in this stackoverflow question.
- Keep the token safe
- A popular way for keeping jwt secure from being stolen in the client side, is by storing it as HttpOnly cookie.
- However, that might not be safe enough against CSRF or even advanced XSS. To be honest, I am not familiar with client-side operations, so I recommend you researching it if you are planning to make your client-side secure from attacks.
- Still, you can reduce the risks by implementing
- strict CSRF policies
- short expiration time for access tokens
- Here are some articles regarding this topic
- https://mannharleen.github.io/2020-03-19-handling-jwt-securely-part-1/
- https://medium.com/swlh/whats-the-secure-way-to-store-jwt-dd362f5b7914
Jwt with django
I am going to implement jwt in DRF with djangorestframework-simplejwt. Here’s the official documentation for it.
- https://django-rest-framework-simplejwt.readthedocs.io/en/latest/
Install
pip install djangorestframework-simplejwt
settings.py
First, add rest_framework_simplejwt.authentication.JWTAuthentication to the DEFAULT_AUTHENTICATION_CLASSES tuple.
# settings.py
REST_FRAMEWORK = {
    ...
    'DEFAULT_AUTHENTICATION_CLASSES': (
        ...
        'rest_framework_simplejwt.authentication.JWTAuthentication',
    )
    ...
}
Then you can configure the settings for your jwt method. Refer to the official documentation for detailed explanation of all the settings
- https://django-rest-framework-simplejwt.readthedocs.io/en/latest/settings.html
Here’s a simple settings where you might want to get started.
# settings.py
from datetime import timedelta

SIMPLE_JWT = {
    "ACCESS_TOKEN_LIFETIME": timedelta(minutes=30),
    "REFRESH_TOKEN_LIFETIME": timedelta(days=1),
    "USER_ID_FIELD": "email",
    "ALGORITHM": "HS256",
    "SIGNING_KEY": settings.SECRET_KEY,
    "VERIFYING_KEY": "",
}
- ACCESS & REFRESH Token Lifetime
- They determine how long your access token and refresh token lasts. Access tokens are basically tokens that the client can put in the Authorization header to gain access to certain endpoints. Refresh tokens are JWT tokens that the client can use to get a new access token.
- USER_ID_FIELD
- This is the unique identifier for the user. Depending on what model you are using for your user, it could be
user_id,email,uuidor whatever you set it to. By default, it isuser_id.
- This is the unique identifier for the user. Depending on what model you are using for your user, it could be
- ALGORITHM
- Default is HS256. This is the algorithm used for signing the token as mentioned above. You can also use asymetric algorithm like RSA, by changing it to
RS256.
- Default is HS256. This is the algorithm used for signing the token as mentioned above. You can also use asymetric algorithm like RSA, by changing it to
- SIGNING & VERIFYING KEY
- Default signing key is the django’s secret key, and verifying key is empy. However, if you are going to use RSA as your algorithm, you have to set them as the private & public key respectively.
urls.py
Now, in your root urls.py file,
# urls.py
from rest_framework_simplejwt.views import (
    TokenObtainPairView,
    TokenRefreshView,
)

urlpatterns = [
    ...
    path('api/token/', TokenObtainPairView.as_view(),
        name='token_obtain_pair'),
    path('api/token/refresh/', TokenRefreshView.as_view(),
        name='token_refresh'),
    ...
]
views.py
Now we have set up our package, let’s use it in our endpoints. The code below is very straight forward. It takes the user as parameter, create tokens, then set is as HttpOnly Cookie, and return it to user.
# views.py
from rest_framework_simplejwt.serializers import TokenObtainPairSerializer


def get_successful_login_response(user: User) -> Response:
    token = TokenObtainPairSerializer.get_token(user)
    refresh_token = str(token)
    access_token = str(token.access_token)
    res = Response(
        {
            "message": "logged in successfully",
            "token": {
                "access": access_token,
                "refresh": refresh_token,
            },
        },
        status=200,
    )
    res.set_cookie("access_token", access_token,
                    httponly=True)
    res.set_cookie("refresh_token", refresh_token,
                    httponly=True)
    return res
Written by
Roger Kim

