cmpnyinfo: deploying through aws I
Subtitle: containerizing nginx, gunicorn and django
Introduction
This post is the first post of the “cmpnyinfo: deploying to aws” series. Throughout this series, I am going to explain how I deployed my cmpnyinfo web-app with aws. The series is going to cover the following topics:
- containerizing nginx, gunicorn and django
- basic of aws’s ECS
- deploying with ECS
In this particular post, I am going to explain the process of
- containerizing nginx, gunicorn and django using docker-compose
General Structure
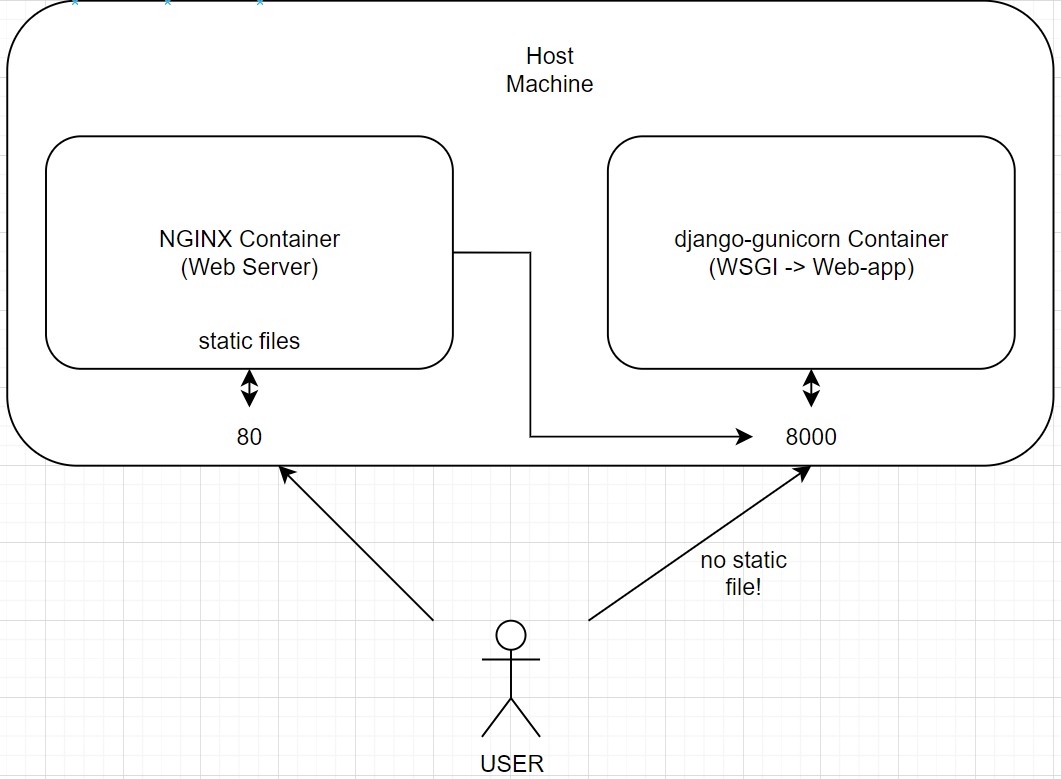 Here’s a picture of the general structure of the two containers we are going to deploy. If you don’t know what nginx and gunicorn are, I highly recommend you to read this post fist.
When the user makes an http request to our domain, it is going to be directed to port 80 by default. So the request is going to go through the nginx container fist, which is listening on port 80.
Then, the nginx container will handle the static files, and redirect the request to the django-gunicorn container, using it’s reverse-proxy feature.
The user CAN directly make an http request to the url “cmpnyinfo-domain.com:8000”. However, since the django application is ran by gunicorn, the webpage is going to look very different from what’s intended by the creator(me).
NGINX container
You may wonder, how do I configure nginx to redirect the http requests to the django-gunicorn container?
Assuming that you have nginx installed in linux, the path for the nginx’s configuration files is /etc/nginx/. Under that directory, you can find a file called nginx.conf. When you take a look at that file, you can find all sorts of configurations for your nginx web server.
I do not recommend you to directly modify the nginx.conf file. Instead, I would modify the default.conf file under the conf.d directory. Here’s an extremely simple default.conf file as an example.
upstream dj-gunicorn {
    server dj-gunicorn:8000;
}

server {
    listen 80;
    server_name some_server_name;

    location / {
        proxy_pass http://dj-gunicorn;
        proxy_set_header Host $host;
        proxy_set_header X-Real-IP $remote_addr;
        proxy_set_header X-Forwarded-For $proxy_add_x_forwarded_for;
    }

    location /static/ {
        alias /path/to/static/;
    }
}
I recommend you to dig a little deeper into nginx’s configuration files. There are a lot of other configurations that you might find handy; such as log_formats, worker_processes, and more. Here’s a greate place to start.
Learn Proper NGINX Configuration Context Logic
https://www.youtube.com/watch?v=C5kMgshNc6g
Explanation
- upstream: a group of backend servers that Nginx can proxy requests to
- listen 80: the server will listen on port 80
- location /static/: you have to tell nginx where your static files are, so that it can handle them
- location / : tells nginx to proxy, or redirect the request to the dj-gunicorn container’s port 8000.
Dockerfile
FROM nginx:1.19.0-alpine

WORKDIR /
COPY ./static /static

#REPLACE DEFAULT CONF FOR NGINX IN CONTAINERE WITH MY DEFAUTL CONF
COPY ./nginx/default.conf /etc/nginx/conf.d/default.conf

CMD ["nginx", "-g", "daemon off;"]
django-gunicorn container
FROM python:3.10-alpine

WORKDIR /usr/src/app

ENV PYTHONDONTWRITEBYTECODE=1
ENV PYTHONUNBUFFERED=1

COPY . /usr/src/app/
RUN pip install -r requirements.txt

EXPOSE 8000

CMD ["gunicorn", "-k", "gevent", "cmpnyinfo.wsgi:application", "--bind", "0.0.0.0:8000"]
I explained about Dockerfile in a great detail in this post. So check it out.
The only thing worth mentioning is the CMD entrypoint. Since now we are no longer running our django application with gunicorn, the command is
gunicorn -k gevent cmpnyinfo.wsgi:application --bind 0.0.0.0:8000
The -k gevent tells gunicorn to run the server asynchronously
docker-compose
Notice how in the nginx’s default.conf file, the dj-gunicorn container is directly set as upstream using it’s name. Well how would nginx know where to find the container? This is possible thanks to the docker-compose.yml file.
version: '3'

services:
  dj-gunicorn:
    image: dj-gunicorn:1.2
    env_file:
      - .env
    build:
      context: .
    ports:
      - "8000:8000"
  nginx:
    image: nginx:3.1
    build:
      context: .
      dockerfile: ./nginx/Dockerfile
    ports:
      - "80:80"
    depends_on:
      - dj-gunicorn
When you run these two container via one docker-compose file, docker will create a network bridge for your containers, so that they can easily communicate with eachother, and refer to eachother by their names.
Now when we run the docker-compose up --build command, voila! We have successfully created an image for our django application, together with the nginx web server!
Conclusion
In this post, I covered
- how to configure nginx’s configuration files
- how to build images for nginx and the django web-app using docker-compose
In the next post of the series, I am going to cover
- the basics of AWS’s Elastic Container Service (ECS)
Written by
Roger Kim

